Sunday, March 28, 2010

Jacket Potatoes

We're a very 'Potato-loving' family so every second day we have some sort of potato being made at home. And since French Fries are the easiest and fastest, we often end up having our Pizza with fries, Pasta with fries, and basically whatever-we-can with fries. But on some days, when I am slightly more energetic than usual, I will make Jacket Potatoes. These take a lot more time to cook than French Fries but they are worth it in the end!


jacket potatoes


For Jacket Potatoes I always use large Russet Potatoes - the skin gets really crispy and one potato makes two servings easily.


First step is to wash the potatoes well scrubbing it with a dish-washing sponge so its as clean as it can possibly be. Next poke each potato with a knife to ensure the potato doesn't pop in the oven as it bakes. Then rub some olive oil on the skin and season it with salt. I usually sprinkle some salt (1/4 tsp) on a flat plate and roll the potato in the plate using my hands to rub in the salt as much as I can.

Finally, in a pre-heated oven at 400 F place the potatoes on a baking sheet and bake for an hour. Do NOT wrap the potato in foil because that is similar to steaming the potato and the crust won't be crispy. The potato is ready when the pulp becomes soft to the touch if you poke it with your hands (but since the potato will be hot wear an oven mitten or use a spoon instead!)


Slice the potato open and scoop out the pulp from each half into a bowl. Sprinkle the empty potato shells with some salt. Season the scooped out pulp in the bowl with salt and pepper. Mix in a tablespoon of sour cream and fill up the shells with the potato mixture. 


Top with Mozarella cheese and bake in the broiler for a couple of minutes till the cheese melts and browns.


Healthier alternative:


Mix in some chopped veges like Green Onions and Tomatoes in the potato mixture. Fill up the shells and exclude the cheese. Serve.

Saturday, March 27, 2010

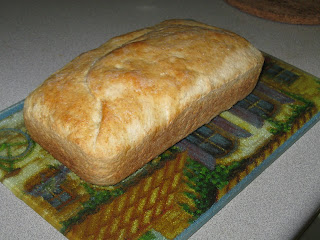
Wholewheat Bread


We're a very small family of two and half people so we rarely get to finish an entire loaf of bread before it goes stale. After having to throw away many many half consumed green moldy loaves of bread I finally decided to make my own small loaf of bread at home. It was an interesting learning experience since I had never made regular bread at home before; and for some strange reason (though it tasted pretty much like regular bread) my son ate it like it was some very special treat.

1 cup warm water
1 packet active/instant dry yeast
2 tablespoons honey
1 and 2/3 cups bread (or white) flour
1 tablespoon butter, melted
2 tablespoons honey
1 teaspoon salt
1 cup whole wheat flour
For brushing the bread once its made:
2 teaspoons butter, melted

In a large bowl, mix warm water, yeast, and 2 tablespoons honey. 


Add white bread flour, and stir to combine. Let set for 30 minutes, or until big and bubbly.  


Mix in 1 tablespoon melted butter, 2 tablespoons honey, and salt. Finally, stir in 1/2 cup whole wheat flour and leave the other half for kneading. 

Flour a flat surface or parchment paper and transfer the dough onto it. Knead with the remaining whole wheat flour until not real sticky - just pulling away from the counter, but still sticky to touch. This MAY take an additional 1/4 cups of whole wheat flour. 

Transfer to a a greased bowl, turning once to coat the surface of the dough. Cover and let rise in a warm place until doubled. After it has doubled, punch it down, and place in a greased 9 x 5 inch loaf pan. Allow to rise until dough has topped the pan by one inch. Its okay if it doesn't top the pan - it varies with the type of wholewheat flour you use. If it is too coarse then the dough becomes heavier so it will not rise all the way out of the pan.


Bake at 350 degrees F (175 degrees C) for 25 to 30 minutes; do not overbake. Lightly brush the top of loaf with 2 teaspoons melted butter or margarine when done to prevent crust from getting hard. Cool completely and enjoy! 


Thursday, March 25, 2010

General Tsao's Chicken

It is one of my personal challenges to re-create restaurant style Chinese dishes at home. I had been working on this particular dish for a while now and finally I got it! I proudly present 'General Tsao's Chicken' at home!


For the chicken you need:

1 pound skinless, boneless chicken breast pieces - cut into 1 inch squares
3 tablespoons cup cornstarch
1 egg
1/2 teaspoon salt
1/4 teaspoon ground black pepper
3 tablespoons all-purpose flour
1/2 teaspoon baking powder
1/4 cup vegetable oil

Mix up all the ingredients except for the oil and marinate for around 20 minutes. Fry in 1/4 cup vegetable oil till chicken is cooked, drain and set aside. Since these are not deep-fried, you have to be careful that the chicken pieces do not stick to each other as they cook. So fry in two batches if you're using a medium sized frying pan, spoon in the chicken piece by piece when you add it to the pan, and use your spoon to separate out any pieces that stick together.


2.5 teaspoons sesame seeds
1 tablespoon grated fresh ginge
1/4 cup chopped green onion
1/4 cup chopped (into large squares) onion
1/2 cup water
3 tablespoons white vinegar
1/4 cup white sugar
1 tablespoon cornflour
1 tablespoon soy sauce
3 tablespoons oyster sauce
3 tablespoons ketchup

For the sauce, use the same oil that you used to fry the chicken. Reduce the heat to medium and add the sesame seeds, ginger, and both onions. As the ginger browns and the onions become limp, pour in the water, vinegar and sugar. Bring to a boil. Meanwhile, dissolve the cornflour in the soy sauce and add to the simmering water. Mix well because the cornflour will begin clumping otherwise. If you feel that it has become too thick you can add more water if you want to.


Mix in the oyster sauce and ketchup and stir till the mixture is smooth. Add the chicken and serve hot with plain rice or fried rice!

Wednesday, March 24, 2010

Nothing Like Homemade Donuts!


The best thing about Homemade Donuts is that they are CHEAP! It comes out to less than a dollar per donut when you make it at home. Also, you can dress them up however you want to and even mix up toppings to make it more fun. 

These are a HIT with kiddie parties!

What you need is:

1 packet active/instant dry yeast
1/5 cup warm water (you might have to increase this if the yeast and water mixture is too thick and clumpy)
3/4 cup warm milk
1/4 cup white sugar
1/2 teaspoon salt
1 egg
2.5 tablespoons shortening
2-1/2 cups cake&pastry (or all purpose) flour
1/8 cup cake&pastry (or all purpose) flour (for kneading)
vegetable oil for frying

Dissolve the yeast in the water in a small bowl and wait till it becomes frothy.  

Mix all the ingredients (except for the oil for frying and the 1/8 cup flour for kneading) together and mix on low speed for a couple of minutes. Transfer the dough onto a floured parchment paper and prepare to knead the dough. Use the 1/8 cup flour set aside for kneading to flour the parchment. The dough will be very soft so you will need to flour your hands to be able to handle the dough initially. You don't have to use all of the 1/8 cup of flour. You may use more or less depending on how comfortable you are with the consistency of the dough. At the end the dough should be on the soft side so be wary of how much flour you add while kneading.


Place the dough in a greased bowl and cover it. Leave it aside till dough atleast doubles in size.


Transfer the dough to the floured parchment paper and flatten it down. Use your hands to stretch out the dough to around 1/2 inch thickness. You can use a rolling pin but the dough is so soft that I can manage to do this with my hands. 


Cut out your donuts with a donut cutter or improvise with round shapes lying around the kitchen. Leave the cut out donuts to rise for around 10 minutes. 


While the donuts rise, put some oil in a deep frying skillet and begin heating it up. The temperature should be around 350 F if you're using a fryer. But its usually a hassle changing the oil in the fryer because I use clean oil to fry donuts else they start smelling of the stuff you fried before in the oil. So in order to save oil and the cleaning efforts I take the smallest saucepan I have and put 3/4 cup oil in it to fry the donuts one at a time.


Once the oil is heated up (and you can test it by frying one of the donut centers first) fry the donuts, flipping the sides as they puff up and brown. Drain on paper towels.


For the toppings you can pretty much do whatever you want. You can use melted chocolate and sprinkles, honey, icing sugar, or make your own sugar glaze by cooking some sugar in water and pouring it over the donuts. My son loves the chocolate ones and my husband prefers them plain so I never need to do so much!

Tuesday, March 23, 2010

Papri Treats!


It was one of those days when I woke up with a Chaat craving. And Chaat is actually pretty simple to assemble at home: just boil some potatoes and chickpeas (or use the canned ones) and add some chopped parsely, tomatoes, onions and green chillies. Mix in some spiced up yogurt (you can use a Chaat mix or just make your own blend at home) with Imli (Tamarind sauce) and voila! The tricky part is the Paapri - especially because Chaat is never complete without Papri!


To prepare the Papri these are the things you will need:

  - 3 cups Maida
  - 1/2 cup Wheat Flour
  - 1/3 cup Oil
  - 1 tsp Red Chili Powder
  - 1/2 tsp Turmeric Powder
  - 1.5 tsp Cumin Seeds
  - 1.5 tsp Ajwain Seeds
  - Salt (according to taste)
  - some water (3/4 cup approx) to knead the flour


Crush the Cumin and Ajwain seeds in a processor till they are a coarse grind. Mix up all the ingredients EXCEPT water in a bowl and slowly add water as you knead the mixture to a hard dough. Remember that the dough should not be too soft like the way you would make for 'Rotis'. So add the water slowly.

Switch to a flat surface and make small balls for each Papri. Its completely upto you how big or small you want the Papri to be. I usually roll out mine to around 6 inches in diameter. Sort of the size of a large donut maybe. 


Deep fry in hot oil till both sides are brown and drain on a paper till dry.

The original recipe that I modified to this one did not state how long to rest the dough before rolling it out so the first time I just kneaded the dough and started making the Papris. They turned out fine but I noticed that when I used the same dough after keeping refrigerating it overnight, the Papri was even crispier. So I suppose if you can be patient enough you should let the dough rest in the fridge for a while, but if you can't that's good enough too!

 This recipe yields 10-12 Papris approx. The yield varies according to how big or small you roll out your Papri.


Sunday, March 7, 2010

Chicken Pie


This is for days you feel like having something really rich, creamy, crunchy and warm. Its very quick to prepare and it 'looks' like you did a lot of work to make it so its great for showing off!


For the crust I use PC Butter Puff Pastry. One sheet is enough to make 2 pies. 

Defrost the crust as instructed in the packaging and lay it out on a parchment. Cut each sheet into 4 equal squares. 


In a separate bowl, prepare some egg wash by mixing an egg with a few drops of milk (the milk is optional). Using a pastry brush line the edges of two squares with some egg wash. With a knife or pastry cutter slice the clean (non-egg-washed) squares into 4 equal strips. Using your craft skills (or not) arrange the strips onto the egg-washed squares to create a border. 


Bake in preheated oven at 375 F for 10 minutes. Don't worry if the center rises too much, it will flatten out when cooled. Remove from oven when the pastry has puffed and browned and leave it to cool.


While the crust cools, prepare your filling.

Sweat a couple of chopped garlic cloves in some oil and add some chopped chicken. Season it and fry till chicken is almost cooked. Add to that your favorite vegetables (I usually add carrots, brocolli, mushrooms and peppers). You can get creative and add some potatoes, baby corn and spinach too. Once the vegetables are tender add a couple of tablespoons of Cream of Mushroom and a couple of tablespoons of cream (or milk) to make some sauce. Don't make it too saucy else the pie will get runny. Pie is ready to be filled once the chicken and vegetables are cooked and the sauce has thickened.

Spoon out the filling into the prepared crust. If the filling is too runny, then be careful not to add too much sauce when filling up your pies. Top it with some grated cheese and put the pies under the broiler for 1.5 minutes. Keep checking to make sure you don't burn the pie under the broiler.


Pizzas Pizzas!

Being itchy about Halal food can be quite a pain sometimes - especially when it comes to ordering Pizza! I just about had it with Shrimp or Veggie Pizzas so I started making my own Pizza at home.


After many adventurous attempts, I finally nailed it down to the following recipe:

Mix 2 cups of Cake and Pastry Flour (or White Flour if you don't have that) with 1 cup of Wholewheat Flour. Add a pinch of salt and mix well. 

In a separate bowl, mix together 1 cup of hot water (don't use boiling water - my tap water is hot enough so I use it direct from there instead of boiling or microwaving) with 3 teaspoons of sugar and add to that 1 package (2 -1/4 tsp) of instant yeast. Mix well and leave for a few seconds.

The mix should become frothy in a few seconds (if you use instant/quick rise yeast) else it will take a few minutes (if you use traditional yeast). If it does not become frothy then discard the yeast and make it again. Sometimes the yeast dies if the water is too hot or it doesn't activate if it is too cold, so if you don't see any froth then your water temperature needs to be adjusted.

To the flour mixture, add 1/4 cup Olive oil and the yeast mixture. Mix and knead the dough and leave aside covered in a plastic bowl for at least 3 hours to rise. This is enough for two large thin crust pizzas; and if you don't like wheat flour, you can make the entire recipe with White flour.

Flatten down the raised dough and divide it into two balls. Take a large sheet of parchment or baking paper and spray it with some canola oil. Spray your hands with some canola and start working with the dough on the sheet. Flatten it out with your hands to make a big enough circle so you can start using a rolling pin. I usually flatten it out to 8 inches in diameter before I switch to a rolling pin.


Transfer the parchment with the fully rolled out dough onto the Pizza pan and use your hands to stretch any edges that need to fit into the shape of your pan.


For the toppings you can pretty much use whatever you want. My favorite is Chicken Salami topped with spinach, mushrooms, peppers, onions, sweet corn and loads of Mozarella. I usually don't like tomato paste so either I will use a very thin film of ketchup or I'll saute some garlic, add a few tablespoons of tomato paste and thin it out with water to make my own garlic-tomato paste.


Trim off the edges of the parchment before transferring the pan to the oven. Bake at 350 F for 15-20 minutes in a preheated oven. Serve Hot!


Tuesday, March 2, 2010

Vegetable Fried Rice

If you ever get tired of authentic Chinese restaurants and miss the desi-style Chinese food, look up for Hakka style Chinese restaurants in your area. Hakka is the Indian Chinese cuisine and its the closest taste to desi-style Chinese food.

This rice is a slightly different from vegetable fried rice in restaurants. It is less oily, has quite a bit of vegetables, and doesn't have the 'crunch' that most fried rices do. I like it this way because it has enough flavor to eat it on its own without any gravy on the side. Also, as is typical with desi-Chinese, the rice used is Basmati.


For 1 cup basmati rice, wash and soak the rice for around 20 minutes. Add to slightly salted boiling water and cook till the rice is almost cooked and ready for 'dam' (steam cook). The best test is to pinch a grain between your fingers: if it splits into two then the rice is not soft enough and needs to be cooked more. The right consistency is when the grain is squashed between your fingers and not broken.

Drain the water out and leave the rice to cool. 
While the rice cools, take the same pot in which you boiled the rice, and sweat a couple of chopped garlic cloves in 4 tablespoons of heated Sesame Oil (or any vegetable Oil) till light brown. Add to that 3 tablespoons chopped onions and 3/4 cup of frozen mixed vegetables and cook till vegetables soften up. 

(If you don't have frozen mixed vegetables then you'll have to chop up some carrots, boil some peas, and mix it together with sweet corn to make your own mix. You can also add green beans and red/green peppers if you like.)

Prepare 1/3 cup of chicken broth and add 2 tablespoons soy sauce to it. Add this sauce to the vegetables. Add a scrambled egg to the vegetables (optional) and mix well. Now add the rice, mix well and cook with the lid on for 10 minutes on Low heat (this is the 'dam' that we give to rice). Serve hot!


Monday, March 1, 2010

Vegetable Chowmein

Vegetable chowmein is not as popular as Chicken chowmein from where I come from. But the reason I like to make it without any meat is that it gives me the flexibility to make a Chinese gravy dish which I can have with the noodles or with Vegetable Fried Rice.


I have two ways of making the chowmein: with Hoisin Sauce and Rice Vinegar or with Oyster Sauce - they both taste great. I usually choose based on what ingredients I have on hand.

For the vegetable medley I don't always have everything at hand so I use whatever I have. You can add and substitute your favorite vegetables and adjust their quantities to your liking. Just don't use soft veges like Tomatoes or Spinach because they have too much water content and the stir fry will become too mushy.

2 cloves garlic (chopped/minced/grated)
1 carrot (sliced)
1 green/red pepper (slivered)
1 crown brocolli (chopped)
1 med onion (cut into medium sized squares)
2-3 mushrooms
1/2 can baby corn
1 green chili or jalapeno (slivered)

 Splash a couple of tablespoons of Sesame Oil (use Canola if you don't have it, but try Sesame Oil whenever you can because it gives a nice nutty flavor to the dish) in a heated wok and sweat the garlic till light brown. Add the vegetables and fry for a few minutes, till the onions become somewhat transparent. 


For the sauce use EITHER of the following two sauces. I've never tried using both the sauces so if you do, let me know how it turns out!

Hoisin + Rice Vinegar Sauce:
Fill up half a cup of boiling water (125 ml) and add one chicken cube to it. (If you don't have an electric kettle for boiling the water and are too lazy to boil the water in a pot, just take half a cup of water, add the chicken cube and microwave for a minute). 
Add to the chicken broth, 1/4 tsp pepper, 1 tablespoon hoison sauce, 1 tablespoon rice vinegar, 2 tablespoons soya sauce, and 1 tsp corn starch. Mix well.

Oyster Sauce:
Fill up half a cup of boiling water (125 ml) and add one chicken cube to it. (If you don't have an electric kettle for boiling the water and are too lazy to boil the water in a pot, just take half a cup of water, add the chicken cube and microwave for a minute). 
Add to the chicken broth, 1/4 tsp pepper, 1 tablespoon Oyster Sauce, 2 tablespoons Soy Sauce, and 1 tsp corn starch. Mix well.

When the onions become somewhat transparent, add the sauce, stir, and cook on med-high heat till the sauce thickens up and the carrots are softened.

Add to the stir fry, half a pack of salted, boiled, and drained noodles. Mix and fry for a minute. Chowmein is ready. Garnish with parsely if you like.


Tip for handling noodles:
I always used to mess up the noodles by either using the wrong type of pasta, or by overcooking it. Finally I figured out a way to have the right consistency of the noodle. I use Farkey Chowmein Noodles but you can use any chinese chowmein noodles for good results. Moreover, I don't completely cook the noodles while they are boiling. I take them out just when they are 'almost' cooked.  Then, when I add the noodles to the stir fry, I mix them up well with the sauce and the vegetables and cook the mixture with the lid on at Low heat for 10 minutes. Sort of analogous to how one would give 'dam' (steam cook) to basmati rice.