Tuesday, May 11, 2010

Boston Creme Strawberry Cake


This is a beautiful butter cake with a Boston Creme filling, topped with lots of whipped cream and strawberries.

For the cake:

1.5 cup cake & pastry (or white) flour
1/2 tsp salt
2 tsp baking powder

Mix together the dry ingredients and leave aside.


1/2 cup butter
1 cup sugar
2 eggs
1 tsp vanilla

In a separate bowl, bring the butter to room temperature and cream with an electric mixer.


Add the sugar, eggs, and vanilla, and mix till light and fluffy.

Alternating with the flour mixture, fold in 3/4 cup of milk to the dry ingredients. Pour the batter in a prepared pan. For this one I used a Tube pan (also known as Angel Food Cake pan). Since I can't use a parchment to line this type of pan I grease the pan with shortening and dab it with  flour. Works like a charm.

Bake at 350 F in a preheated oven for 30 minutes or till the sides of the cake separate from the pan and an inserted toothpick comes out clean.


Cool to room temperature.

For the Bostom Creme Filling:

In a medium sized saucepan mix together:

1/3 cup sugar
3 tbsp cornstarch
pinch of salt

Add 1.5 cup milk and put the saucepan on medium heat. Stir constantly and cook till mixture thickens and comes to a boil.

In a separate bowl, lightly beat the yolks of two eggs. Before adding the yolks to the hot milk mixture you have to raise the temperature of the eggs. This is called 'tempering'. To the eggs add a tbsp of the hot milk and mix the yolks well. Add another tbsp of the hot milk and mix well. Now add all of the egg mix into the saucepan with the hot milk and stir constantly as sauce thickens and comes to a boil.

Remove from heat and stir in 2 tsp vanilla. Transfer to a glass/ceramic bowl and cover with cling film - with the plastic touching the sauce to prevent a skin from forming as the sauce cools down. Bring to room temperature.


When the cake has cooled, cut into two layers and fill with cooled bostom creme. Finally, frost the top layer with whipped cream and sprinkle with chopped strawberries.

For the whipped cream I just used half a cup of whipping cream and used an electric mixer to whip till peaks were stiff. Then I used a piping bag to pipe out the cream as shown in the picture. You can also just use a spatula to spread out the cream if you don't have the decorating tools.


Cool in fridge for a couple of hours and serve.

Monday, May 10, 2010

Chicken Manchurian


I've been to quite a few hakka Chinese restaurants in town but I could never find the red 'ketchupy' Chicken Manchurian you find back home!

1/2 kg boneless chicken breast - diced
1/2 tsp salt
1/4 tsp pepper
1 tbsp chopped garlic
1 tbsp white flour
1 tsp sesame oil
1/2 egg

1/4 cup canola oil (for frying)

Marinate the chicken for 30 minutes and fry in canola oil till chicken is cooked and no longer pink. Drain on paper towel and keep aside.


For the sauce:
1/4 cup squarely chopped green pepper
1/4 cup squarely chopped onion
3 tbsp chopped garlic
2 tbsp finely chopped ginger

Using 4 tbsp of the canola oil used for frying the chicken, fry the above vegetables till peppers and onions are limp.


Add the cooked chicken.


Add:
4 tbsp ketchup
4 tbsp chilli garlic sauce

The original recipe calls for Chilli Garlic Sauce but I never have it so I used: 3 tbsp chilli sauce (This is NOT the same as Tabasco or Hot sauce)  + 2 tbsp chopped garlic + 2 tsp sugar + 2 tbsp crushed chillis.

Season with salt and pepper and add 1/2 cup of water. Mix well and cook for a minute or so. Meanwhile, prepare 2 tbsp cornflour in 1/4 cup of water and add that to the sauce. Also add 2 tbsp Worcestershire Sauce and mix well.

Finally add 1/4 cup of chopped (1 inch) green spring onions and cook with lid on for 2 minutes. Add 1 tsp lemon juice and serve.


Sunday, May 9, 2010

Princess Cake!!!

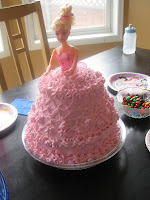
My niece wanted one of those standing-upright princess cakes for her 7th birthday. A store-bought cake was costing around 35 dollars and Wilton sells a princess cake baking kit for around 30 dollars. So I decided to make one at home with the pans I already had. And it literally cost us nothing since most of the stuff was already in the pantry!


For the cake I used 3 batches of my chocolate cake recipe. For the pans I used two round pans and one pyrex bowl to shape
the dress of the doll.


For the doll I took a barbie doll and removed her legs. Rolled up the dress and covered her in plastic wrap up to her waist.

For the filling I made a chocolate truffle filling:

3 cups whipping cream
2.5 tbspn butter
3 tbspn sugar

Pour the above three ingredients in a saucepan and cook on medium heat till the butter has melted and the cream comes to a boil.

Meanwhile, put 4.5 cups of semisweet chocolate chips in a glass/ceramic mixing bowl. When the cream comes to a boil, pour it on the chocolate chips and leave for 5 minutes. Mix well and let it cool to room temperature. Use an electric beater to whip up the truffle mix.

Prepare to assemble when the cakes have cooled down completely.

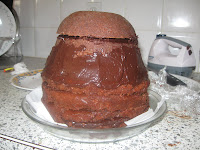
Trim off the top of the cakes so they are all levelled. Slice all three cakes into two layers each. Start off with the circles and layer the cake with the truffle filling as shown in the pictures. Depening on the size of the pyrex bowl, the dome shaped cake may or may not fit perfectly on top of the round cakes. In my case the dome was slightly smaller so I used the truffle mix to even out the shape of the dress and it worked pretty well.


Cover in a plastic wrap and leave in the fridge for 2 hours.

For the icing, I made a plain whipped cream icing and added some pink food coloring to it.

Just take 3 cups of whipping cream and whip it with an electric beater till it has soft peaks. Add food coloring depending on how much color you want to give to the doll. Beat with a mixer till stiff peaks form.

Before you begin the icing you have to make a small space at the top of the cake to fit the doll into. Using a spoon and a knife scoop out just enough cake so the doll can fit in. Cake is now ready to be frosted.

This cake will get two layers of icing. The first one will act as a base. So cover the cake with almost 1/3 of the icing mix and smooth it out with strips of parchment paper. Leave in the fridge for 3 hours to overnight.


Fit in the doll at the top of the cake and use the rest of the icing to decorate the dress.


Thursday, April 8, 2010

Chocolate Cake


I've had this chocolate cake recipe for 15 years now and it ALWAYS works. Its so easy my 3 year old does most of the work for me!

Start off with the chocolate base:


1/2 cup unsalted butter
1/4 cup cocoa powder
1 cup sugar


Melt the butter in a saucepan and add  the cocoa powder. Cook for 1 minute on low heat stirring constantly. Don't overcook or the cake will taste of burnt cocoa. Add the sugar and mix till incorporated. The mixture will darken when you add the sugar. Remove from heat.

2 Eggs
3/4 cup Cake &Pastry Flour (or All-purpose Flour) with a tiny pinch of salt (don't add the salt if you're using salted butter)
1 1/2 tsp baking powder
1/2 cup milk


In a separate bowl mix together the eggs. The next step is to mix in the cocoa mixture. Keep in mind that the cocoa mixture will be warm and the eggs will be cold. So you will need to bring up the temperature of the eggs gradually. This process is called Tempering: Mix in a bit of the hot mixture in the eggs and mix well. Gradually add more of the hot liquid and mix well. Slowly add the entire cocoa mix in the eggs mixture and mix well.


Mix the baking powder and salt in the flour and fold the dry mix in the cocoa batter. (Feel free to taste the mixture as you mix it.) Fold in the milk. Pour in a lined baking pan and bake in a preheated oven at 350 F for 20 mins.

A quick way to dress it: Smooth over some Nutella on the cooled cake and viola! 

More fun ways to make this cake:

Bake it in a Wilton Character Pan - I did Elmo for my son's 2nd Birthday last year: 


A good friend of mine (Tamania) used the same recipe to make Cupcakes too: 


Wednesday, April 7, 2010

Mini Pizzas!

The best comfort foods in the world: pastas and mini puffy cheesy pizzas!


For the crust:

Prepare the pizza crust by mixing together 3 cups of All-purpose Flour with 1/4 teaspoon salt. Prepare the yeast mixture by adding a sachet of fast-rising yeast with 1 cup warm water and 3 tsp sugar. Mix the yeast mixture with the flour mixture and add 1/4 cup Olive oil. Knead well and leave covered in a greased bowl for at least 3 hours. 

For the topping:

Mix together your favorite blend of Pizza veges. I use Spinach, Red Peppers, Olives, Corn, Mushrooms and just a bit of Onions. For the meat you can use whatever you like from shrimp to left-over roast chicken. I used Chicken Sausages in this one. You can also just exclude the meat if you want to.


Beat down the dough and transfer to a greased parchment paper. Since the dough is a bit on the sticky side, I spray my hands with some canola oil and that helps a lot. Divide the dough into 6 balls. Pat them down to as big or small you want your pizza to be. Mine are around 6-7 inches in diameter.


Top each base with 1 tbsp ketchup and 1/2 tbsp sour cream and spread across with a spoon.


Spoon the toppings over the base and top with lots of shredded Mozarella Cheese.


Bake in preheated oven at 400 F for 12 minutes.


 And if you're not satisfied, you can always turn to the expert Pizza Maker for help.

Tuesday, April 6, 2010

Hot Dogs with Peppers!


This is a fun and easy way to glorify the simple hotdog! Its barely even a recipe but its worth posting and you'll know it when you have one of these yourself!

The only twist to this hotdog recipe is the way you cook it. 

Slice some Red Peppers, Onions and Green chillies. If you don't want it too spicy then remove the seeds from the chilli. Fry these in some oil and as the onions go limp add the hotdogs.


Cook till the sausages have cooked through and stuff them in Sesame dressed Hotdog Buns. For the toppings use Mustard, Mayo, Ketchup and Green Relish. Enjoy!


Sunday, April 4, 2010

Masala Chicken

I've got so bored of the standard Chicken Salan that I had to come up with something new to make with bone-in chicken. So one day when all I had left in my freezer stock were Curry-cut chicken pieces I decided to marinate that like Chicken Tikka and cook it like salan - Most Yummy it turned out! Of course it had no name (not that I know of) so I call it Masala Chicken.


Marinate the (1/2 kg) chicken in Yogurt (1/4 c) with ground roasted cumin and coriander seeds (1 heaped tbsp each). Mix in the spices according to taste (Turmeric, Salt, Pepper, Cayenne or Red Pepper, Garam Masala). I just use approx 1/2 tsp of each. Add 3 cloves of crushed garlic and 1 tablespoon of crushed ginger. (Its always easy to use the cheese grater for garlic and ginger when you have such small quantities). Add juice of half a lemon (the big ones) - 2 tbsp approx and mix well so all the pieces are well coated.

Leave the marinade for at least an hour.

Saute some onions (1 small) till browned and add the chicken along with all the sauce. 


Cook on med-high for a few minutes and toss the chicken regularly. Cover with lid and reduce the heat to med-low. Cook with lid on for another 5 mins. Meanwhile chop 1/4 cup of green onions and one medium tomato. Add to the mixture and cook till meat is tender. For this dish I try and cook the chicken without the lid so it stays on the dry side. If you want it to have some more gravy you can leave the lid on longer.

Enjoy with Roti or Rice.


Sunday, March 28, 2010

Jacket Potatoes

We're a very 'Potato-loving' family so every second day we have some sort of potato being made at home. And since French Fries are the easiest and fastest, we often end up having our Pizza with fries, Pasta with fries, and basically whatever-we-can with fries. But on some days, when I am slightly more energetic than usual, I will make Jacket Potatoes. These take a lot more time to cook than French Fries but they are worth it in the end!


jacket potatoes


For Jacket Potatoes I always use large Russet Potatoes - the skin gets really crispy and one potato makes two servings easily.


First step is to wash the potatoes well scrubbing it with a dish-washing sponge so its as clean as it can possibly be. Next poke each potato with a knife to ensure the potato doesn't pop in the oven as it bakes. Then rub some olive oil on the skin and season it with salt. I usually sprinkle some salt (1/4 tsp) on a flat plate and roll the potato in the plate using my hands to rub in the salt as much as I can.

Finally, in a pre-heated oven at 400 F place the potatoes on a baking sheet and bake for an hour. Do NOT wrap the potato in foil because that is similar to steaming the potato and the crust won't be crispy. The potato is ready when the pulp becomes soft to the touch if you poke it with your hands (but since the potato will be hot wear an oven mitten or use a spoon instead!)


Slice the potato open and scoop out the pulp from each half into a bowl. Sprinkle the empty potato shells with some salt. Season the scooped out pulp in the bowl with salt and pepper. Mix in a tablespoon of sour cream and fill up the shells with the potato mixture. 


Top with Mozarella cheese and bake in the broiler for a couple of minutes till the cheese melts and browns.


Healthier alternative:


Mix in some chopped veges like Green Onions and Tomatoes in the potato mixture. Fill up the shells and exclude the cheese. Serve.